
4,887 total views, 1 views today
Introduction
Since the Allstarlink node is based on telephone switch (PBX) software (called Asterisk), it is possible to include a landline or VoIP telephone in the Allstarink community, allowing it to communicate and command the Allstarlink node with DTMF commands.
This short document gives step-by-step instructions in how to obtain this connection. You must be able to log into your Allstarlink node (with SSL or local console) and edit the configuration files in order to follow them.
Step 1: Preparing Asterisk for the SIP protocol
VoIP phones (and phone adapters) will use the SIP (Session Initiation Protocol) for setting up and taking down phone connections. By default, the Allstarlink’s configuration does not allow this, so it must be enabled in its configuration as follows:
Make the following modifications to /etc/asterisk/modules.conf:
Change the line: unload => chan_sip.so to load => chan_sip.so
Make the following modifications to /etc/asterisk/sip.conf:
In the section [general], change the line
bindaddr = 127.0.0.1 into bindaddr = 0.0.0.0
Test procedure: Restart Asterisk with # service asterisk restart (the # sign indicates that this must be done in super user mode, write sudo bash to get there). Now the command $ netstat -anu should return a list with the following line included:
udp 0 0 0.0.0.0:5060 0.0.0.0:*
If not, fix the problem before moving to the next step.
Step 2: Register phone extension
The file /etc/asterisk/sip.conf must contain a list of extension numbers and related information. It should contain a number of sections like this:
[211]
type=friend
host=dynamic
username=211
secret=1234
dtmfmode=rfc2833
context=sip-phones
callerid="Anders-PC" <211>
In this example, the extension numbers are in the range 200-299. Make at least two copies of this section and change the numbers accordingly. The “secret” is a password used by the VoIP phone. If your Allstarlink node is reachable from the Internet, the password should be strong, not “1234”.
Test procedure: Restart Asterisk with # service asterisk restart. Install a SIP Phone app (often called softphone) on at least two devices in your network. I am using “MicroSIP” on Windows and “Mizudroid” on Android. Configure them according to the Allstarlink’s IP address, extension number and password. The following illustrations serves as an example on the MicroSIP configuration screen:
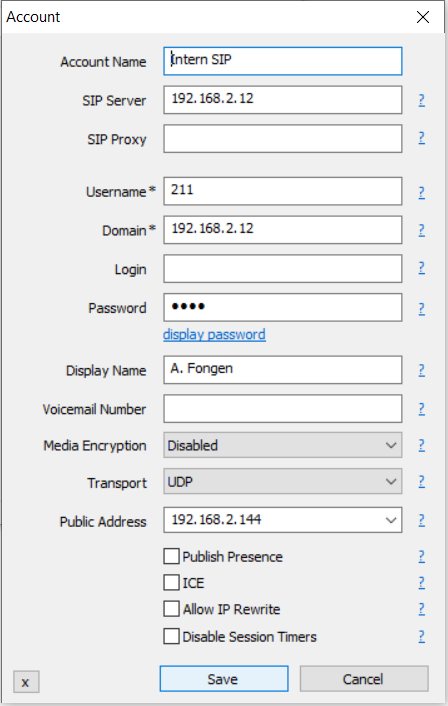
The MicroSIP main screen should now indicate “online” on the bottom line.
Configure two softphones on two different devices with different extension numbers, and make sure they are indicating a successful connection with the Allstarlink node. Do not move on to the next step until this is verified.
Step 3: Set up extension handling
The next step involves editing of /etc/asterisk/extensions.conf. First, make a copy of the original file in case you want to return to the original configuration later:
# cp extensions.conf extensions.conf.orig
Above the last line in the file (#includeifexist….) include this section in extensions.conf
[sip-phones]
exten => _2XX,1,Dial(SIP\/${EXTEN},60,rT)
exten => 300,1,Ringing()
exten => 300,n,Wait(2)
exten => 300,n,Answer()
exten => 300,n,rpt(51201|P); Change 51201 to your own node mumber
exten => 300,n,Hangup
The first exten-line allows the softphones to connect to each other, so we try this first. The lines with “exten => 300…” allows the phones to connect to the repeater. Remember to enter your own node number in the place of the “51201”
Test procedure: Restart Asterisk with # service asterisk restart. From one softphone, dial the number of the other and check that there is a voice connection between them. Connect also in the opposite direction. Do not move on until this is successful (there are often some problems in this step which needs to be sorted out.
Now you may try to dial “300” to connect to the repeater. You should hear one “ring” in the softphone and then silence. You are hopefully now connected to the repeater, and can command it with DTMF, e.g. *712 to have it say the time of day. You can connect the repeater to another node with *3xxxxxx and start talking. Your PTT is pressed with the *99 code and released with #.
Enjoy your new function and move on to the next step if you want to allow the repeater to connect to the softphones from a radio handset.
Step 4: Connecting to VoIP phones from a local radio handset
This step will enable a handset local to the Allstarlink node to set up a voice connection to a SIP phone using DTMF codes. To dial from a handset local to a different Allstarlink node does not require more configuration and is described in Step 5.
The file /etc/asterisk/rpt.conf should be modified as follows: Uncomment these lines around line no. 232 and give them this content:
61=autopatchup,noct=0,quiet=1,farenddisconnect=1,dialtime=5000
62=autopatchdn
These lines will allow the radio side to initiate a phone connection through the use of DTMF codes *61xxx and disconnect with *62 (unless the phone hangs up first). The call will be given the default context value “radio” and processed by the rules in extensions.conf.
There are several ways to modify this file to obtain the desired effect, one of which is shown here:
Modify the file /etc/asterisk/extensions.conf as follows: Make sure that the [radio] section has the following content:
[radio]
exten => _2XX,1,Dial(SIP/\${EXTEN})
The other lines in the same section should be commented out. The pattern _2XX matches the number range 200-299 and may be changed according to your own number plan.
This is the simplest possible modification to extensions.conf, but it breaks the neat logic in the distributed file. Please study this logic structure if you want a more “proper” modification.
You may not succeed in disconnecting with *62 if your repeater uses simplex communication (same frequency for transmit and receive) while the squelch indicator is lit. If noone picks up the phone, the ringing tone you hear in the handset will stop you from disconnecting (because the repeater doesn’t listen while it is transmitting), and you will have to wait until the ringing times out.
Test procedure: Restart Asterisk with # service asterisk restart. From a radio handset, dial *61210 (given that your SIP phone has extension 210). The phone should now ring, and when you answer the call you should be communicating with the handset without the use of DTMF codes *99 and #. You will still need to press PTT on the handset prior to talking. The phone is given a VOX function, which means that the handset should not press PTT while the squelch indicator is lit.
Step 5: Connecting to VoIP phones on a different node
It is now even possible to connect to a VoIP phone from a handset connected to a different Allstarlink node. With the radio handset, follow these steps:
- Connect to the other node (where the VoIP phone is connected) with DTMF *3xxxxx
- Set the other node in “command mode” with *4xxxxx (same node numer as in line 1)
- Call the VoIP phone with *61210 (given the extension 210)
Test procedure: Follow the steps above and observe the result. The comments from the test procedure in Step 4 applies as well.
Finally
I hope this little text may provide fun and a little experience in the configuration of Asterisk. Another fun addition is to connect a landline phone through a VoIP adapter, e.g. the Linksys SPA2102, which I bought from Ebay for $15. Get the nostalgic feeling of talking to a repeater net through a landline phone!
Finally, do not hesitate to send suggestions for improvements and clarifications.